Nostr NIPS 46
NIP-46
Nostr Remote Signing
Changes
remote-signer-key is introduced, passed in bunker url, clients must differentiate between remote-signer-pubkey and user-pubkey, must call get_public_key after connect, nip05 login is removed, create_account moved to another NIP.
Rationale
Private keys should be exposed to as few systems - apps, operating systems, devices - as possible as each system adds to the attack surface.
This NIP describes a method for 2-way communication between a remote signer and a Nostr client. The remote signer could be, for example, a hardware device dedicated to signing Nostr events, while the client is a normal Nostr client.
Terminology
- user: A person that is trying to use Nostr.
- client: A user-facing application that user is looking at and clicking buttons in. This application will send requests to remote-signer.
- remote-signer: A daemon or server running somewhere that will answer requests from client, also known as “bunker”.
- client-keypair/pubkey: The keys generated by client. Used to encrypt content and communicate with remote-signer.
- remote-signer-keypair/pubkey: The keys used by remote-signer to encrypt content and communicate with client. This keypair MAY be same as user-keypair, but not necessarily.
- user-keypair/pubkey: The actual keys representing user (that will be used to sign events in response to
sign_eventrequests, for example). The remote-signer generally has control over these keys.
All pubkeys specified in this NIP are in hex format.
Overview
- client generates
client-keypair. This keypair doesn’t need to be communicated to user since it’s largely disposable. client might choose to store it locally and they should delete it on logout; - A connection is established (see below), remote-signer learns
client-pubkey, client learnsremote-signer-pubkey. - client uses
client-keypairto send requests to remote-signer byp-tagging and encrypting toremote-signer-pubkey; - remote-signer responds to client by
p-tagging and encrypting to theclient-pubkey. - client requests
get_public_keyto learnuser-pubkey.
Initiating a connection
There are two ways to initiate a connection:
Direct connection initiated by remote-signer
remote-signer provides connection token in the form:
bunker://<remote-signer-pubkey>?relay=<wss://relay-to-connect-on>&relay=<wss://another-relay-to-connect-on>&secret=<optional-secret-value>
user passes this token to client, which then sends connect request to remote-signer via the specified relays. When connecting this way client SHOULD include optional_client_metadata in the connect request (see Client metadata
), since unlike nostrconnect:// this token carries no information identifying client. Optional secret can be used for single successfully established connection only, remote-signer SHOULD ignore new attempts to establish connection with old secret.
Direct connection initiated by the client
client provides a connection token using nostrconnect:// as the protocol, and client-pubkey as the origin. Additional information should be passed as query parameters:
relay(required) - one or more relay urls on which the client is listening for responses from the remote-signer.secret(required) - a short random string that the remote-signer should return as theresultfield of its response.perms(optional) - a comma-separated list of permissions the client is requesting be approved by the remote-signername(optional) - the name of the client applicationurl(optional) - the canonical url of the client applicationimage(optional) - a small image representing the client application
Here’s an example:
nostrconnect://83f3b2ae6aa368e8275397b9c26cf550101d63ebaab900d19dd4a4429f5ad8f5?relay=wss%3A%2F%2Frelay1.example.com&perms=nip44_encrypt%2Cnip44_decrypt%2Csign_event%3A13%2Csign_event%3A14%2Csign_event%3A1059&name=My+Client&secret=0s8j2djs&relay=wss%3A%2F%2Frelay2.example2.com
user passes this token to remote-signer, which then sends connect response event to the client-pubkey via the specified relays. Client discovers remote-signer-pubkey from connect response author. secret value MUST be provided to avoid connection spoofing, client MUST validate the secret returned by connect response.
Request Events kind: 24133
{
    "kind": 24133,
    "pubkey": <local_keypair_pubkey>,
    "content": <nip44(<request>)>,
    "tags": [["p", <remote-signer-pubkey>]],
}
The content field is a JSON-RPC-like message that is NIP-44
encrypted and has the following structure:
{
    "id": <random_string>,
    "method": <method_name>,
    "params": [array_of_strings]
}
idis a random string that is a request ID. This same ID will be sent back in the response payload.methodis the name of the method/command (detailed below).paramsis a positional array of string parameters.
Methods/Commands
Each of the following are methods that the client sends to the remote-signer.
| Command | Params | Result |
|---|---|---|
connect | [<remote-signer-pubkey>, <optional_secret>, <optional_requested_perms>, <optional_client_metadata>] | "ack" OR <required-secret-value> |
sign_event | [<{kind, content, tags, created_at}>] | json_stringified(<signed_event>) |
ping | [] | "pong" |
get_public_key | [] | <user-pubkey> |
nip04_encrypt | [<third_party_pubkey>, <plaintext_to_encrypt>] | <nip04_ciphertext> |
nip04_decrypt | [<third_party_pubkey>, <nip04_ciphertext_to_decrypt>] | <plaintext> |
nip44_encrypt | [<third_party_pubkey>, <plaintext_to_encrypt>] | <nip44_ciphertext> |
nip44_decrypt | [<third_party_pubkey>, <nip44_ciphertext_to_decrypt>] | <plaintext> |
switch_relays | [] | ["<relay-url>", "<relay-url>", ...] OR null |
logout | [] | "ack" |
Requested permissions
The connect method may be provided with optional_requested_perms for user convenience. The permissions are a comma-separated list of method[:params], i.e. nip44_encrypt,sign_event:4 meaning permissions to call nip44_encrypt and to call sign_event with kind:4. Optional parameter for sign_event is the kind number, parameters for other methods are to be defined later. Same permission format may be used for perms field of metadata in nostrconnect:// string.
Client metadata
The connect method may be provided with optional_client_metadata so that remote-signer can identify and label the connection. It is a JSON-stringified object whose fields mirror the nostrconnect:// query parameters, all optional:
name- the name of the client applicationurl- the canonical url of the client applicationimage- a small image representing the client application
This is most useful for a connection initiated by remote-signer (the bunker:// flow), where — unlike nostrconnect:// — remote-signer has no other source for this information. To send metadata without requesting permissions, an empty string MUST be passed for optional_requested_perms so that the metadata occupies the fourth position. The metadata is client-supplied and unauthenticated; remote-signer SHOULD treat it as a display hint only and MUST NOT use it for authorization decisions.
Switching relays
At all times, the remote-signer should be in control of what relays are being used for the connection between it and the client. Therefore it should be possible for it to evolve its set of relays over time as old relays go out of operation and new ones appear. Even more importantly, in the case of the connection initiated by the client the client may pick relays completely foreign to the remote-signer’s preferences, so it must be possible for it to switch those immediately.
Therefore, compliant clients should send a switch_relays request immediately upon establishing a connection (always, or at reasonable intervals). Upon receiving such requests, the remote-signer should reply with its updated list of relays, or null if there is nothing to be changed. Immediately upon receiving an updated relay list, the client should update its local state and send further requests on the new relays. The remote-signer should then be free to disconnect from the previous relays if that is desired.
Ending a session
When the user logs out of the client, the client MAY send a logout request to inform the remote-signer that the session is no longer needed. Upon receiving such a request, the remote-signer SHOULD remove the session associated with the requesting client-pubkey and reject any further requests from it (a new connect would be required to re-establish a session). The remote-signer should reply with "ack" before removing the session.
The logout request is a courtesy hint and is not a security boundary: the remote-signer MUST NOT rely on it being sent, and the client MUST still delete its locally stored client-keypair on logout regardless of whether the request was acknowledged.
Response Events kind:24133
{
    "id": <id>,
    "kind": 24133,
    "pubkey": <remote-signer-pubkey>,
    "content": <nip44(<response>)>,
    "tags": [["p", <client-pubkey>]],
    "created_at": <unix timestamp in seconds>
}
The content field is a JSON-RPC-like message that is NIP-44
encrypted and has the following structure:
{
    "id": <request_id>,
    "result": <results_string>,
    "error": <optional_error_string>
}
idis the request ID that this response is for.resultsis a string of the result of the call (this can be either a string or a JSON stringified object)error, optionally, it is an error in string form, if any. Its presence indicates an error with the request.
Example flow for signing an event
remote-signer-pubkeyisfa984bd7dbb282f07e16e7ae87b26a2a7b9b90b7246a44771f0cf5ae58018f52user-pubkeyis alsofa984bd7dbb282f07e16e7ae87b26a2a7b9b90b7246a44771f0cf5ae58018f52client-pubkeyiseff37350d839ce3707332348af4549a96051bd695d3223af4aabce4993531d86
Signature request
{
    "kind": 24133,
    "pubkey": "eff37350d839ce3707332348af4549a96051bd695d3223af4aabce4993531d86",
    "content": nip44({
        "id": <random_string>,
        "method": "sign_event",
        "params": [json_stringified(<{
            content: "Hello, I'm signing remotely",
            kind: 1,
            tags: [],
            created_at: 1714078911
        }>)]
    }),
    "tags": [["p", "fa984bd7dbb282f07e16e7ae87b26a2a7b9b90b7246a44771f0cf5ae58018f52"]], // p-tags the remote-signer-pubkey
}
Response event
{
    "kind": 24133,
    "pubkey": "fa984bd7dbb282f07e16e7ae87b26a2a7b9b90b7246a44771f0cf5ae58018f52",
    "content": nip44({
        "id": <random_string>,
        "result": json_stringified(<signed-event>)
    }),
    "tags": [["p", "eff37350d839ce3707332348af4549a96051bd695d3223af4aabce4993531d86"]], // p-tags the client-pubkey
}
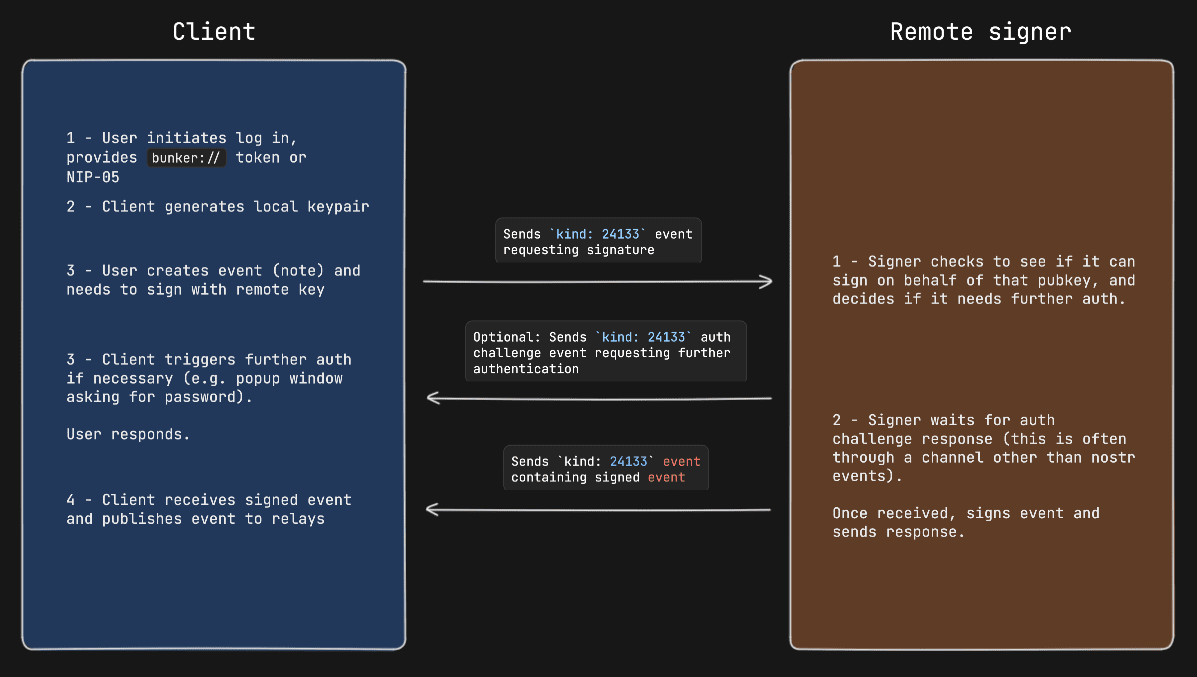
Diagram

Auth Challenges
An Auth Challenge is a response that a remote-signer can send back when it needs the user to authenticate via other means. The response content object will take the following form:
{
    "id": <request_id>,
    "result": "auth_url",
    "error": <URL_to_display_to_end_user>
}
client should display (in a popup or new tab) the URL from the error field and then subscribe/listen for another response from the remote-signer (reusing the same request ID). This event will be sent once the user authenticates in the other window (or will never arrive if the user doesn’t authenticate).
Example event signing request with auth challenge
Appendix
Announcing remote-signer metadata
remote-signer MAY publish its metadata by using NIP-05
and NIP-89
. With NIP-05, a request to <remote-signer>/.well-known/nostr.json?name=_ MAY return this:
{
    "names":{
        "_": <remote-signer-app-pubkey>,
    },
    "nip46": {
        "relays": ["wss://relay1","wss://relay2"...],
        "nostrconnect_url": "https://remote-signer-domain.example/<nostrconnect>"
    }
}
The <remote-signer-app-pubkey> MAY be used to verify the domain from remote-signer’s NIP-89 event (see below). relays SHOULD be used to construct a more precise nostrconnect:// string for the specific remote-signer. nostrconnect_url template MAY be used to redirect users to remote-signer’s connection flow by replacing <nostrconnect> placeholder with an actual nostrconnect:// string.
Remote signer discovery via NIP-89
remote-signer MAY publish a NIP-89 kind: 31990 event with k tag of 24133, which MAY also include one or more relay tags and MAY include nostrconnect_url tag. The semantics of relay and nostrconnect_url tags are the same as in the section above.
client MAY improve UX by discovering remote-signers using their kind: 31990 events. client MAY then pre-generate nostrconnect:// strings for the remote-signers, and SHOULD in that case verify that kind: 31990 event’s author is mentioned in signer’s nostr.json?name=_ file as <remote-signer-app-pubkey>.
Source: nostr-protocol/nips/46.md version: 2b1e71b 2026-06-23T07:40:17-04:00